



Blog
Base Cap Moulding: How to Build a Taller Baseboard


Base cap moulding is a small decorative moulding that sits on the top edge of a flat baseboard. It turns a plain board into a layered, built-up baseboard, adds height and a soft shadow line, and covers the gap where the top of the baseboard meets a wall that is not perfectly flat.
What is base cap moulding?
Base cap, also called baseboard cap, is the top piece of a built-up baseboard. On its own it is only about 3/4″ to 2 1/2″ tall. Its job is to finish the square top edge of a flat board, usually a 1×4, 1×6 or 1×8, with a profile such as an ogee, a cove or a bead.
Put the two together and you get a baseboard that looks like one tall, detailed piece of trim. This is how baseboards were made in many older homes, and it is still the way finish carpenters build tall, traditional base today.
Why use a base cap instead of a one-piece baseboard?
A one-piece profiled baseboard is quick to install, and we stock plenty of them. A built-up baseboard with a cap is worth the extra step when:
- You want a taller baseboard. A cap on top of a 1×8 gives you a base close to 10″ tall, a height that suits rooms with high ceilings and is hard to find in a single profile.
- Your walls are not flat. A wide one-piece baseboard is stiff, so it leaves gaps along wavy walls. In a built-up base, the flat board runs straight along the floor and the thin cap bends to follow the wall, so the top edge sits tight.
- You want to upgrade the baseboard you already have. If your existing baseboard is a plain, square-edged board, adding a cap on top gives it a finished, traditional look without pulling anything off the wall.
- You want to choose the height and the profile separately. Pick the board for the height and the cap for the style, then change either one without starting over.
- You want stained trim. Some of our caps come in the same hardwoods as our boards, so the whole baseboard can be stained to match your floors, doors or cabinets.
The parts of a built-up baseboard
A full built-up baseboard has up to three parts:
- The base board. A flat board that sets the height. Boards that are smooth on all four sides, called S4S boards, are the usual choice.
- The base cap. The moulding on top, which sets the style.
- The base shoe. An optional small moulding at the floor, such as our BS001 Base Shoe or quarter round. It covers the gap between the baseboard and the floor and bends to follow a floor that is not level. Our shoe moulding vs quarter round guide helps you choose between them.
A two-piece baseboard uses the board and the cap. A three-piece baseboard adds the shoe.
Base cap profiles and sizes
We stock nine base cap profiles, from small, simple caps to tall, layered ones. Sizes are listed as thickness by height.
| Profile | Size | Species | Good with |
|---|---|---|---|
| MC101 Potlatch | 9/16″ x 3/4″ | Finger joint pine | 1×4 or 1×6 board |
| MC103 Troy | 9/16″ x 3/4″ | Alder, finger joint pine, maple, red oak, poplar, white oak | 1×4 or 1×6 board |
| SP001 Caroline | 7/8″ x 1 1/4″ | Primed radiata pine | 1×6 board |
| MC135 Coronado | 11/16″ x 1 3/8″ | Finger joint pine | 1×6 board |
| MC139 Santa Fe | 3/4″ x 1 5/8″ | Poplar | 1×6 or 1×8 board |
| MC141 Regal | 3/4″ x 1 5/8″ | Poplar | 1×6 or 1×8 board |
| MC137 Monica | 3/4″ x 1 13/16″ | Alder, finger joint pine, maple, red oak, poplar, white oak | 1×6 or 1×8 board |
| MC140 Estates | 11/16″ x 2 3/8″ | Finger joint pine | 1×8 board or wider |
| MC567 Eagle | 11/16″ x 2 7/16″ | Finger joint pine | 1×8 board or wider |
Most profiles come in 8 ft and 16 ft lengths, with a 4″ sample so you can hold the profile against your board before you order. Stock varies on a few of them, so check with your nearest showroom.
How to choose a base cap
Start with the height
The height of the finished baseboard is the height of the board plus the height of the cap. Taller rooms can carry a taller base, and our guide to sizing trim to your ceiling height helps you find the right proportion. A few combinations that work well:
| Board | Cap | Finished height, about | Suits |
|---|---|---|---|
| 1×4 (3 1/2″) | MC101 Potlatch (3/4″) | 4 1/4″ | Smaller rooms, standard 8 ft ceilings |
| 1×6 (5 1/2″) | MC137 Monica (1 13/16″) | 7 5/16″ | Most living spaces, 8 to 9 ft ceilings |
| 1×8 (7 1/4″) | MC140 Estates (2 3/8″) | 9 5/8″ | Formal rooms and ceilings of 10 ft or more |
The board sizes are actual milled widths. Our board size guide lists the actual size of every board we carry.
Match the thickness
Choose a cap at least as thick as your board, so it fully covers the board’s top edge and its front sits just proud of the board face. That small step is what creates the shadow line that makes a built-up base look finished.
Match the style of the room
Small, simple caps such as MC101 and MC103 suit Craftsman, farmhouse and transitional rooms. Taller, layered caps such as MC137, MC140 and MC567 suit Colonial, Victorian and formal traditional rooms. Our baseboard style guide shows how each style comes together, and our guide to layering moulding shows how to carry the same detail up to the casing and crown.
Paint or stain
For painted trim, finger joint pine is primed and ready for paint. For stained trim, MC103 and MC137 come in alder, maple, red oak, white oak and poplar, and our 1×6 and 1×8 boards come in matching hardwoods, so the board and cap take the stain the same way.
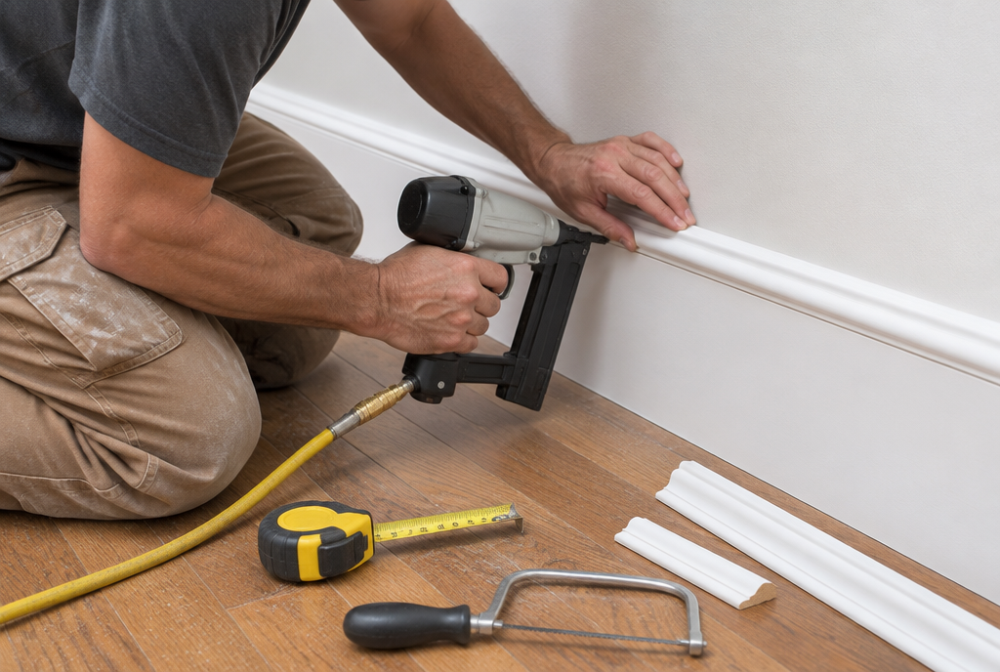
How to install base cap moulding
- Install the board first. Nail the flat board into the wall studs, keeping its top edge straight and level, since the cap will follow it.
- Cut the corners. Miter outside corners at 45 degrees. On inside corners, cope the cap, cutting one piece to the shape of the other, so the joint stays closed if the wall moves. Practice on a 4″ sample first.
- Join long runs. Where one length meets the next, cut both ends at matching 45 degree angles, called a scarf joint, and place the joint where you can nail into a stud.
- Nail it in place. Use 18 gauge brad nails, angled through the cap into the wall framing, plus a few down into the top edge of the board. Press the cap against the wall as you go so it follows the wall rather than the board.
- Caulk and paint. Run a thin bead of paintable caulk along the top edge where the cap meets the wall, fill the nail holes, then paint or stain.
Adding a cap to an existing baseboard works the same way. Cut away any old caulk along the top edge, clean the edge so the cap sits flat, then follow steps 2 to 5.
Other places to use base cap
Because it finishes the edge of a flat board, base cap also works:
- Along the top of flat board wainscoting. For wall panels built with a ledge, our panel caps are made for that job. Our wainscoting guide covers the full build.
- Around the base of built-ins, kitchen islands and bookcases, to match the baseboard in the rest of the room.
- On the top edge of a flat skirt board on a staircase.
How much base cap do you need?
You need the same length of cap as of baseboard. Measure each wall, add the lengths together and add about 10% for cuts and waste. Our trim calculator does the math for every room and shows how many lengths to buy. Longer 16 ft lengths mean fewer joints on long walls.
Want to see a profile in a room before you decide? Try it in our Room Visualizer.
See base cap in person. Visit any of our four showrooms in the Bay Area and Sacramento, where 4 inch samples are available, or call us at 925-798-7525, and we will help you match a cap to your board and your room. Find your nearest showroom.
Frequently Asked Questions (FAQs)
Base cap is a small moulding that sits on the top edge of a flat baseboard. It finishes the square edge with a profile such as an ogee, a cove or a bead, so the board and cap together look like one tall, detailed baseboard. It also covers the gap where the top of the baseboard meets a wall that is not perfectly flat.
Both are small mouldings used with a flat baseboard. Base cap goes on top of the board and sets the style. Base shoe goes at the bottom, where the baseboard meets the floor, and covers the gap left by a floor that is not level. A three-piece baseboard uses both.
Yes, if the existing baseboard has a flat, square top edge. Cut away any old caulk along the top, clean the edge so the cap sits flat, then nail the cap through to the wall framing, caulk the top edge and paint. It is one of the easiest ways to make a plain baseboard look custom.
Install the flat board first, with its top edge straight. Miter the cap at outside corners, cope it at inside corners and join long runs with 45 degree scarf joints. Nail it with 18 gauge brads through to the wall framing and down into the top of the board, then caulk along the wall, fill the nail holes and paint.